
How much does a new pitched roof cost in the UK
February 19, 2024
Professional roofers in lancaster
March 13, 2024
How to Install an EPDM Rubber Roof from Start to Finish
If you’re in need of a durable and cost-effective roofing solution, look no further than EPDM rubber roofs. Easy to install and long-lasting, EPDM roofs have become increasingly popular among homeowners and contractors alike. In this comprehensive guide, we’ll take you through the step-by-step process of installing an EPDM rubber roof from start to finish. Whether you’re a seasoned DIY enthusiast or a professional roofer, you’ll find all the information and tips you need to successfully complete your project. From preparing the roof surface and applying adhesive to rolling out the EPDM membrane and making watertight seals, we’ll cover it all. With our guidance, you’ll be able to tackle this project with confidence and achieve a watertight and durable EPDM rubber roof that will protect your home for years to come. Say goodbye to leaks and expensive repair bills, and say hello to a high-performing and low-maintenance roof. Let’s get started on your EPDM rubber roof installation journey!
Advantages of EPDM Rubber Roofs
EPDM rubber roofs offer numerous advantages that make them an attractive choice for both residential and commercial buildings. Firstly, EPDM is highly durable and can withstand extreme weather conditions, including heavy rain, snow, and hail. This makes it an ideal option for areas with harsh climates. Additionally, EPDM roofs have a long lifespan, typically lasting 30 years or more with proper maintenance. This longevity means fewer repair and replacement costs over time, making EPDM a cost-effective roofing solution.
EPDM rubber roofs are also known for their flexibility, which allows for easy installation on roofs with complex shapes and angles. Furthermore, EPDM is resistant to UV rays and ozone, preventing it from cracking or deteriorating over time. This resistance to aging ensures that your EPDM roof will remain in excellent condition for many years.
Lastly, EPDM rubber roofs are an environmentally friendly choice. The manufacturing process of EPDM involves minimal waste, and the material itself is recyclable. By choosing an EPDM roof, you’re not only protecting your home but also contributing to a more sustainable future.
Understanding the Materials Needed for Installation
Before you start installing your EPDM rubber roof, it’s essential to gather all the necessary materials. Here’s a list of the items you’ll need:
- EPDM membrane: Measure your roof’s dimensions accurately to determine the amount of EPDM membrane you’ll need. It’s advisable to purchase an extra 10% for any mistakes or future repairs.
- Adhesive: Choose a high-quality adhesive specifically designed for EPDM roofing. Make sure it’s compatible with both the EPDM membrane and the roof substrate.
- Seam primer: This primer is used to prepare the seams and edges of the EPDM membrane for bonding. It ensures a strong and watertight seal.
- Seam tape: Seam tape is applied to the seams of the EPDM membrane to reinforce and seal them. It adds extra strength and prevents water infiltration.
- Flashing: Flashing is used to protect vulnerable areas of the roof, such as chimneys, vents, and skylights. EPDM flashing is available in various sizes and shapes to suit different applications.
- Roofing screws and plates: These are used to secure the flashing and other accessories to the roof. Ensure that the screws and plates are made of stainless steel or other corrosion-resistant materials.
- Tools: You’ll need a range of tools, including a utility knife, paintbrush, roller, scissors, roofing scraper, and a measuring tape. Having the right tools on hand will make the installation process much smoother.
By gathering all the necessary materials beforehand, you’ll be well-prepared to start installing your EPDM rubber roof.
Preparing the Roof for EPDM Installation
Proper preparation of the roof surface is crucial for a successful EPDM installation. Follow these steps to ensure your roof is ready:
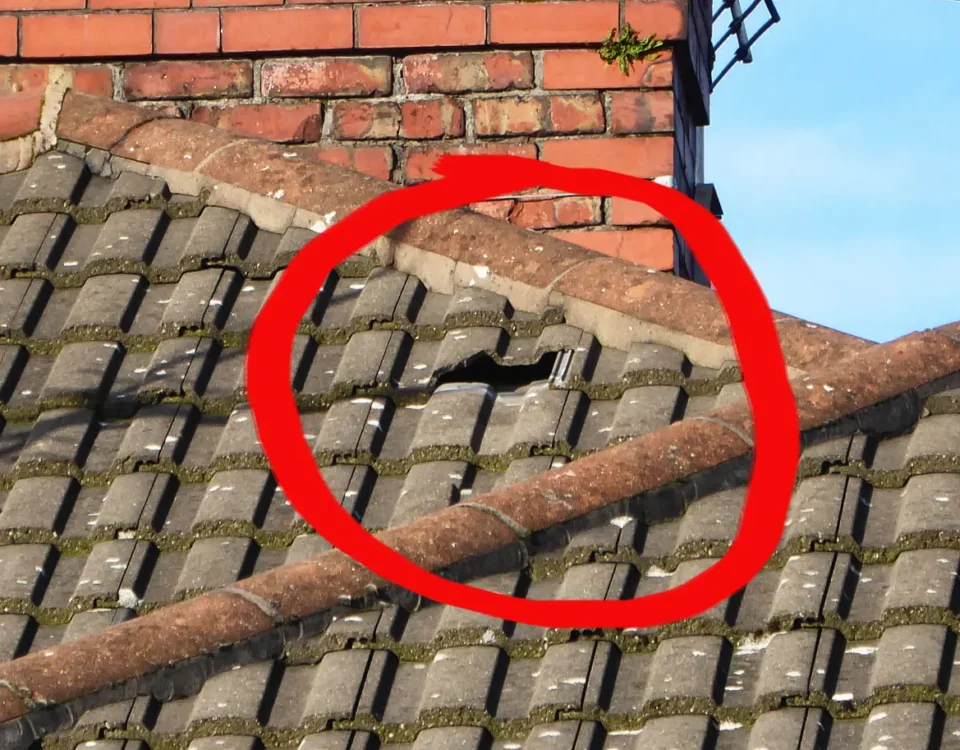
- Inspect the roof: Before you begin, carefully inspect the roof for any damage or areas that require repair. Fixing any issues beforehand will prevent future problems.
- Clean the roof: Remove any dirt, debris, or loose materials from the roof surface. Use a roofing scraper or a broom to sweep away leaves, branches, and other debris. Cleaning the roof will ensure proper adhesion of the EPDM membrane.
- Check for moisture: It’s essential to ensure that the roof is dry before installing the EPDM membrane. Use a moisture meter to check for any moisture trapped beneath the roof surface. If moisture is present, wait until the roof is completely dry before proceeding.
- Repair and reinforce the roof: If you come across any damaged areas or weak spots during the inspection, repair them before installing the EPDM membrane. Use appropriate materials and techniques to reinforce the roof surface and ensure its structural integrity.
Once you’ve completed these preparation steps, you’re ready to move on to the actual installation of the EPDM rubber roof.
Step-by-Step Guide to Installing EPDM Rubber Roofs
Installing an EPDM rubber roof may seem like a daunting task, but by following these step-by-step instructions, you’ll find it more manageable:
- Measure and cut the EPDM membrane: Measure your roof’s dimensions accurately, and transfer those measurements onto the EPDM membrane. Add a few extra inches to each side for overhang. Using a sharp utility knife, carefully cut the EPDM membrane to the desired size.
- Apply adhesive to the roof surface: Start by applying a thin and even layer of adhesive to the roof surface using a paintbrush or roller. Ensure that the adhesive covers the entire area where the EPDM membrane will be installed. Follow the manufacturer’s instructions for the specific adhesive you’re using.
- Roll out the EPDM membrane: Carefully position the EPDM membrane on the adhesive-coated roof surface. Start from one side and slowly unroll the membrane, making sure it lies flat and smooth. Avoid pulling or stretching the membrane excessively, as it may lead to wrinkles or tears.
- Secure the EPDM membrane: Once the EPDM membrane is in place, use a broom or roller to press it firmly onto the adhesive-coated roof surface. This step ensures proper adhesion and eliminates air pockets or bubbles.
- Apply adhesive to the edges and seams: Using a paintbrush or roller, apply adhesive to the edges and seams of the EPDM membrane. This adhesive will help create a strong and watertight seal.
- Install seam tape: Place the seam tape over the adhesive-coated seams of the EPDM membrane. Press firmly to ensure proper bonding. Seam tape reinforces the seams and prevents water infiltration.
- Trim excess EPDM membrane: Trim any excess EPDM membrane using a sharp utility knife. Leave a small overhang of about 2-3 inches to allow for expansion and contraction.
- Install flashing and other accessories: Install EPDM flashing around chimneys, vents, skylights, and other vulnerable areas. Secure the flashing using roofing screws and plates. Follow the manufacturer’s instructions for proper installation techniques.
- Make watertight seals: Use seam primer and adhesive to create watertight seals around the flashing and other accessories. This step is crucial to prevent water leakage and ensure the longevity of your EPDM rubber roof.
By following these step-by-step instructions, you’ll be able to install an EPDM rubber roof with confidence and precision.
Tips for Ensuring a Successful Installation
While the installation process may seem straightforward, here are some additional tips to help you achieve a successful EPDM rubber roof installation:
- Read the manufacturer’s instructions: Before starting the installation, thoroughly read and understand the manufacturer’s instructions for the specific EPDM membrane and adhesive you’re using. Following these guidelines will ensure optimal performance and longevity of your roof.
- Work in favorable weather conditions: It’s best to install an EPDM rubber roof on a dry and warm day. Avoid extreme temperatures, as they can affect the adhesive’s performance and the EPDM membrane’s flexibility.
- Take safety precautions: When working at heights, always prioritize safety. Use appropriate safety gear, such as harnesses, gloves, and non-slip footwear. Ensure that the roof surface is stable and secure before starting the installation.
- Double-check measurements and cuts: Accurate measurements and precise cuts are crucial for a proper fit and seamless installation. Double-check your measurements before cutting the EPDM membrane to avoid costly mistakes.
- Minimize foot traffic on the EPDM membrane: Once the EPDM membrane is installed, minimize foot traffic on the roof to prevent damage. If you need to access the roof, use walkways or boards to distribute your weight evenly.
By following these tips, you’ll increase the likelihood of a successful EPDM rubber roof installation and enjoy its benefits for years to come.
Common Mistakes to Avoid During EPDM Installation
While EPDM rubber roof installation is relatively straightforward, there are some common mistakes that you should avoid:
- Insufficient surface preparation: Failing to clean and properly prepare the roof surface can lead to poor adhesion and compromised performance. Take the time to clean, repair, and reinforce the roof before installing the EPDM membrane.
- Inadequate adhesive coverage: Applying too little adhesive or unevenly spreading it can result in weak bonds and potential leaks. Follow the manufacturer’s instructions for the recommended adhesive coverage and ensure an even application.
- Overstretching the EPDM membrane: Stretching the EPDM membrane excessively can lead to wrinkles, tears, and premature aging. Handle the membrane with care and avoid pulling or stretching it beyond its limits.
- Neglecting seam and edge sealing: Properly sealing the seams and edges of the EPDM membrane is crucial for preventing water infiltration. Take the time to apply primer and adhesive, and securely fasten the seam tape.
- Ignoring safety precautions: Roofing work can be dangerous, especially when working at heights. Always prioritize safety by using appropriate safety gear and following safety guidelines.
By avoiding these common mistakes, you’ll ensure a successful EPDM rubber roof installation and enjoy its benefits for years to come.
Maintaining and Caring for Your EPDM Rubber Roof
To maximize the lifespan and performance of your EPDM rubber roof, regular maintenance and care are essential. Here are some tips to help you keep your roof in optimal condition:
- Clean the roof regularly: Remove any debris, leaves, or branches that accumulate on the roof surface. This prevents clogging of drains and gutters and ensures proper water runoff.
- Inspect the roof periodically: Regularly inspect your EPDM rubber roof for any signs of damage, such as tears, punctures, or loose seams. Address any issues promptly to prevent further damage or leaks.
- Avoid walking on the roof unnecessarily: Minimize foot traffic on the EPDM membrane to prevent damage. If you need to access the roof, use walkways or boards to distribute your weight evenly.
- Remove snow and ice carefully: If you live in an area with heavy snowfall or ice accumulation, take precautions when removing snow or ice from your roof. Use a plastic shovel or a roof rake to prevent damage to the EPDM membrane.
- Schedule professional inspections: Consider hiring a professional roofing contractor for periodic inspections of your EPDM rubber roof. They can identify any potential issues early on and provide necessary repairs or maintenance.
By following these maintenance tips and caring for your EPDM rubber roof properly, you’ll extend its lifespan and ensure its optimal performance.
Hiring Professionals vs. DIY Installation
Deciding whether to hire professionals or tackle the EPDM rubber roof installation as a DIY project depends on various factors, including your level of expertise, time availability, and budget.
If you have prior experience in roofing and feel confident in your abilities, DIY installation can be a cost-effective option. However, keep in mind that proper installation techniques and adherence to manufacturer’s guidelines are crucial for optimal performance. Any mistakes or shortcuts during the installation process can lead to costly repairs down the line.
On the other hand, hiring professionals ensures that the installation is done correctly and efficiently. Professional roofers have the experience, knowledge, and specialized tools to handle EPDM rubber roof installations. They can also provide warranties and guarantees on their work, giving you peace of mind.
Consider your own capabilities, the complexity of your roof, and the importance of a flawless installation when deciding between DIY and professional installation.
Conclusion
Installing an EPDM rubber roof can provide your home with a durable, long-lasting, and cost-effective roofing solution. By following the step-by-step instructions outlined in this guide, you’ll be able to successfully install an EPDM rubber roof from start to finish. Remember to gather all the necessary materials, prepare the roof surface adequately, and follow the manufacturer’s instructions for optimal results. Additionally, regular maintenance and care will ensure the longevity and performance of your EPDM rubber roof. Whether you choose to tackle the installation as a DIY project or hire professionals, an EPDM rubber roof will protect your home for years to come, providing a watertight and low-maintenance roofing solution. Say goodbye to leaks and expensive repairs and enjoy the benefits of an EPDM rubber roof.
